Programming a LiftMaster opener to your vehicle can seem daunting, but it can be accomplished quickly and effectively with the correct steps and a little patience. The process varies slightly depending on whether your vehicle is equipped with HomeLink® or not.

What is HomeLink®?
HomeLink® is like your home’s special remote control that you can access right from the comfort of your car. Think of it as your magical button that can control various devices at home, like your garage door opener, lights, or even your security gates. It’s all wireless, so there’s no need for additional remotes or gadgets!
If you like garage door remotes and keypads for their convenience, you’ll love HomeLink®. With HomeLink®, you don’t need to worry about fumbling for the garage remote in the dark or leaving your home lights on when you’re away – you can control all these with a simple touch of a button inside your car. It’s all about making your life easier and your home more accessible, even when you’re on the go!
HomeLink® is compatible with most garage door openers.
Need more clarification on compatibility? Check out this tool provided by LiftMaster.

3 Easy Steps to Program a LiftMaster Opener to Your Vehicle
To program a LiftMaster opener to your vehicle using HomeLink®, you’ll need the remote you currently have programmed to the door opener, and you’ll need to move your car outside of the garage if it is not already there—park near the garage door but outside the garage.
Step 1: Clearing the HomeLink® Memory
Start by clearing out any previous programming in your vehicle’s HomeLink® system to ensure a smooth programming process. To do this, press and hold the two outer HomeLink® buttons until the indicator light starts flashing. This usually takes about 20 seconds.
Step 2: Programming the HomeLink® System
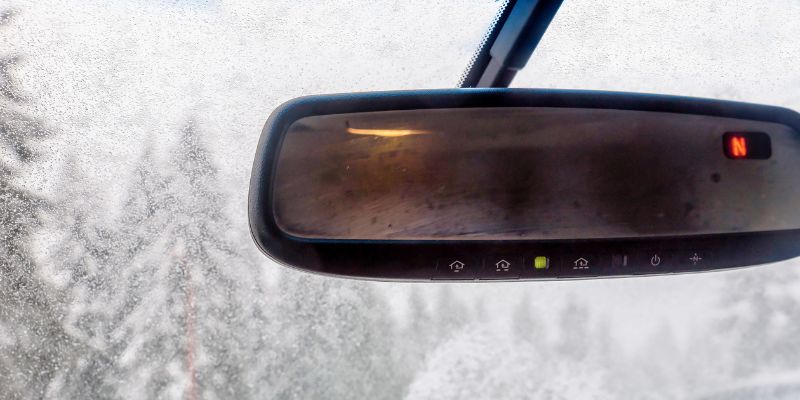
Once you’ve cleared the memory, it’s time to program the HomeLink® system. The steps may vary slightly depending on your vehicle’s make and model. Your car may have three HomeLink® buttons on the mirror, visor, or overhead console®.
Let’s assume you want to program the HomeLink® button on your mirror. Turn on the ignition, leave your vehicle in park, and keep your foot off the pedals. Next, place the remote control garage door opener near the HomeLink® buttons on the mirror and press the button on your control that opens the garage door while simultaneously pressing the HomeLink® button you would like to program.
The HomeLink® indicator light will flash slowly before becoming solid or flashing rapidly. When the indicator light is solid, the programming should be complete.
If the HomeLink® light continues to flash rapidly, press the HomeLink® control button twice. The door should activate but if this does not activate your garage door, move on to step three.
Step 3: Connecting to the Garage Door Opener
Step 3 is time-sensitive. Read the instructions fully before you begin.
Go to your garage door opener and locate the “LEARN” button. Most garage door openers installed after 2010 have a Yellow “LEARN” button on the back or side of the unit. You may need to remove or lift the lightbulb cover to reveal the button.
Press the “LEARN” button on your LiftMaster opener, usually on the back or side of the unit. Immediately return to your vehicle (within 30 seconds), firmly press and hold the programmed HomeLink® button for two seconds, and release. Repeat the press/hold/release sequence up to three times to complete the programming process.
Test the Connection
Make sure your program is successful by pressing the HomeLink® button and waiting until your garage responds. If the process is successful, it will open immediately or close once the button is selected.

For Vehicles without HomeLink®
For vehicles without HomeLink®, LiftMaster offers a universal remote control that can be programmed to operate two different brand garage doors. The programming steps are:
Step 1: Prepare Your Remote
Start by pressing and holding the left and right buttons on the remote until the LED blinks.
Step 2: Programming the Remote
Press and release the button you wish to program on the remote control. Then, press and release the “learn” button on your LiftMaster garage door opener.
Step 3: Finalizing the Programming
Press and release the remote control button again. The garage door opener lights will blink, indicating that the car is now programmed to operate your door.
Please remember that patience is key when you need to program your LiftMaster opener to your vehicle.
Happy programming!
Disclaimer: Always check your vehicle’s user manual and the LiftMaster user manual for any specific instructions related to your model.
For Further Assistance Contact Doorvana
If you encounter any difficulties, don’t hesitate to consult the user manual or reach out to a professional near you. Homeowners in North Texas are welcome to contact our team at Doorvana for garage door replacements or repairs. Reach us by phone at (817) 500-5988 or fill out our contact form here.
Who is Doorvana? We’re an industry-leading provider of garage door services in North Texas. We specialize in garage door installation, repair, and maintenance, providing exceptional service to homeowners across the region.


